It's Christmas Eve, and here I sit surfing the Internet, shopping for new supplies, and waiting for my husband to come home from work. I can't ever seem to quit looking for new tools and supplies to play with, even on a day like today. Today is also my older brother's birthday, and though I'm sure he doesn't read my blog, I'll wish him a very happy birthday anyways. ^_^
I'd like to wish you all a very Merry Christmas, too! And my gift to you--A handful of new items in my shop ^_^. I've listed a couple of those new knot earrings and a couple of other items -- more will come after Christmas.
I'm also excited about participating in one of my favorite jewelry suppliers' contests again this year--Fire Mountain Gems Metal clay, metal bead, wirework and chain contest. I have 2 planned entries this year, though I do wish I'd had more finished by now. Both entries will make it to my shop eventually.
So have a wonderful Christmas, everyone (and even if you don't celebrate Christmas, have a wonderful day!). ^_~

Friday, December 24, 2010
Wednesday, December 22, 2010
Updated knot earrings!

1. They're now soldered! I previously used epoxy to bond the knot to the post, mostly due to the irregular surface join. The epoxies I use are self-leveling and generally do a great job of filling those gaps, but when it came to larger knots with smaller pads and posts, the knots would separate from the pad much too easily. So, I've experimented with soldered versions with great success!
2. Solid gold! Coming soon are my knot earrings in solid 10k/14k gold. The first ones will likely be 10k knots on gold-filled posts, but 14k posts are coming soon.

I'm very excited to offer these improved designs and new metals, and would love feedback on them. If you happen to purchase a pair once they are listed, please let me know what you think of them!
Wednesday, December 8, 2010
Blog neglect (again), new pieces & Christmas sales
Oh my, my. I tried so very hard to keep up with this blog, but yet again I fail in an epic sort of way. Only one post for November?! Well, I don't suppose it would make you feel any better if I said that most of November was spent designing lots of new jewelry, would it? ^_^ The 95 item count in my shop reflects the rate at which I've been finishing new pieces ^_~.
I've been taking care of custom item requests and trying hard to get to work on Christmas projects. I suppose between the two, my time has dwindled. I also make all of my Christmas cards every year, so that takes up a large chunk of time, too. As of right now, I have about 2/3 of my cards finished. Must....work.... faster!
Sometimes I get lucky and the weekends offer at least a little bit of rest, but as of late, that hasn't been true either. This weekend is shaping up to be busy yet again, with a last-minute surprise: I get to attend my 2nd 49ers football game of the season on Sunday. *laughs* And anyone who knew me up through a few years ago would ask: You watch football?! The once-frightening answer today: yes, I do. Though I must admit that I love baseball a whole lot more.
I would also like to take this moment to thank everyone who has purchased jewelry from me this year, my first in business. I truly enjoy designing jewelry and it is thanks to you that I can continue to do what I love. I have been absolutely floored by the number of inquiries and purchases this holiday season. So, thank you! I promise, I will find a way to thank you more directly for your business soon ^_^.
I have some wonderful ideas in the works for new jewelry -- some of which I hope to actually get in my shop before Christmas, but I can't make any promises. At least I finally updated this blog, though! ^_^
Monday, November 8, 2010
New wire designs, upcoming projects & blog neglect
Here I am again, apologizing for neglecting this blog *sigh*. If only I could find the time to keep up with everything! Well, I may neglect my blog from time to time, but I've been busy with some new jewelry designs in wire.
Yesterday, I uploaded quite a few new ring designs in copper, bronze and gold filled wire to my shop. I've actually been quite thrilled with all of them! What's funny is every single one is done 'freehand' rather than with a jig. I always had relied upon a jig to create consistent wire designs, but I've come to the conclusion recently that my designs done freehand are much more interesting.
It's always interesting to revisit a technique after a long absence from it (in this case, wirework), because sometimes you find that you're actually better at it after the break than you were before!
Or maybe it's just me. *shrug* I don't believe I ever did very well in braiding wire, and yet I had a very beautifully successful braiding experiment that became the ring you see above. I also found that free-handing loopy floral or Celtic designs is actually quite easy for me. Of course, having some of the best jeweler's pliers in the world helps.
I had always wanted to design my own wire-based pearl rings, and found that I was able to do this quite easily (see ring at right). I suppose this would also work for just about any half-drilled gemstone bead, too. The ring you see at the right here actually features a gorgeous AAA-grade 6-7mm round white pearl.
I also found that I had an easier time weaving beads into these designs than I remember. I wove both gemstones and crystal beads into some very fun ring designs and absolutely LOVE how they turned out! The ring you see here to the left is made with both bronze wire and gold filled, and then features tanzanite colored swarovski crystals woven into the open floral pattern. In my opinion, it turned out beautifully!
I also created a very similar design to the tanzanite crystal ring in copper with garnet beads as the accents, but in the case of that ring, the use of gold filled wire as the weaving wire (to weave the beads in) created a nice contrast to the red hue of the copper.
I really wish copper and bronze got more attention than they do. In my opinion, they are beautiful metals--as beautiful as yellow and rose gold--and yet they seem to get passed over all the time. They're less expensive, but look equally gorgeous in jewelry designs. I suppose the one thing gold has on both of them is the lack of tarnishing. But yet, so many people own sterling silver, which tarnishes because of the copper it contains!
This brings me to my upcoming projects: I'm working on some new design ideas for bronze, copper, and silver metal clay. Because where I live tends to cut my clay working time very short, I generally have to begin working with a very specific plan. "Playing" is pretty much out of the question because the clay dries out far too quickly. So, please do stay tuned for these new designs--I hope to be using the kiln this week!
 |
| Adjustable braided bronze ring |
Yesterday, I uploaded quite a few new ring designs in copper, bronze and gold filled wire to my shop. I've actually been quite thrilled with all of them! What's funny is every single one is done 'freehand' rather than with a jig. I always had relied upon a jig to create consistent wire designs, but I've come to the conclusion recently that my designs done freehand are much more interesting.
It's always interesting to revisit a technique after a long absence from it (in this case, wirework), because sometimes you find that you're actually better at it after the break than you were before!
 |
| Bronze wire and pearl ring |
I had always wanted to design my own wire-based pearl rings, and found that I was able to do this quite easily (see ring at right). I suppose this would also work for just about any half-drilled gemstone bead, too. The ring you see at the right here actually features a gorgeous AAA-grade 6-7mm round white pearl.
 |
| Bronze, gold fill & tanzanite crystal ring |
I also created a very similar design to the tanzanite crystal ring in copper with garnet beads as the accents, but in the case of that ring, the use of gold filled wire as the weaving wire (to weave the beads in) created a nice contrast to the red hue of the copper.
 |
| Copper, gold fill & garnet ring |
This brings me to my upcoming projects: I'm working on some new design ideas for bronze, copper, and silver metal clay. Because where I live tends to cut my clay working time very short, I generally have to begin working with a very specific plan. "Playing" is pretty much out of the question because the clay dries out far too quickly. So, please do stay tuned for these new designs--I hope to be using the kiln this week!
Saturday, October 16, 2010
The first chainmaille purse
I mentioned these awhile ago, and I finally have come up with a finished purse design. I dare say that it's less-than-perfect, but I'm quite pleased with the finished look of it.
Originally, I wanted to go with a flat, zippered design, but in the end, the weight of the chainmaille made a drawstring design far more practical and a bit simpler to create. I may eventually attempt a zippered design, but for now, I'm loving the drawstring. But, let's back up a little bit and let me introduce you to just how I created the first one.
Pieceing the bag together
The main body of the purse is actually made from pre-woven welded chainmaille mesh that I get from a popular chainmaille supplier. In the case of this first purse, I actually stitched scraps of this welded mesh 'fabric' together using rings that are a bit thicker gauge and slightly larger than those in the mesh itself. I did so in a way that makes them stand out (yes, the visibility of the seams is intentional). In the future I may attempt to blend them in more, but for a first experiment, I was more interested in whether or not I could actually create the finished piece rather than make it look 100% perfect.
Once I had a large enough piece of 'fabric' created, I proceeded to fold it in half and stitch up the sides with much thicker, heavier gauge rings. I used these same rings to go all the way around the top of the bag to create the drawstring part. At this point, I took a scrap piece of leather and fed it through the cinching rings at the top to see how the whole thing would look when closed. Here's what it looked like at that point:

Note that in the photo, I have also already attached larger rings to hold the straps, and the straps are temporarily held on with some coated pieces of wire (twist ties! *laughs*). This is what it looked like when hanging:

Materials, straps, and lining
I had really wanted to use mostly leather for the drawstring and strap, and ultimately decided upon a piece of suede to be the drawstring and the thick leather seen in the photos above to be the strap. The next thing I decided to do was to figure out what would hold the drawstring closed. At first I thought about a bead, but I didn't have anything on hand that really suited--I envisioned beads as tassels on the dangling pieces of leather, but to cinch the drawstring and hold it closed ... that was another problem.
I dove into the random metal pieces on my desk and found a beautiful steel coil just sitting there unused. It ended up being the perfect size for the drawstring! Huzzah!

And that, ladies and gents, is how the bag was created. It certainly isn't perfect, and I learned a number of things along the way (including how bad my stitching ability can be! *laughs*), but I'm very pleased with the result.


Originally, I wanted to go with a flat, zippered design, but in the end, the weight of the chainmaille made a drawstring design far more practical and a bit simpler to create. I may eventually attempt a zippered design, but for now, I'm loving the drawstring. But, let's back up a little bit and let me introduce you to just how I created the first one.
Pieceing the bag together
The main body of the purse is actually made from pre-woven welded chainmaille mesh that I get from a popular chainmaille supplier. In the case of this first purse, I actually stitched scraps of this welded mesh 'fabric' together using rings that are a bit thicker gauge and slightly larger than those in the mesh itself. I did so in a way that makes them stand out (yes, the visibility of the seams is intentional). In the future I may attempt to blend them in more, but for a first experiment, I was more interested in whether or not I could actually create the finished piece rather than make it look 100% perfect.
Once I had a large enough piece of 'fabric' created, I proceeded to fold it in half and stitch up the sides with much thicker, heavier gauge rings. I used these same rings to go all the way around the top of the bag to create the drawstring part. At this point, I took a scrap piece of leather and fed it through the cinching rings at the top to see how the whole thing would look when closed. Here's what it looked like at that point:

Note that in the photo, I have also already attached larger rings to hold the straps, and the straps are temporarily held on with some coated pieces of wire (twist ties! *laughs*). This is what it looked like when hanging:

Materials, straps, and lining
I had really wanted to use mostly leather for the drawstring and strap, and ultimately decided upon a piece of suede to be the drawstring and the thick leather seen in the photos above to be the strap. The next thing I decided to do was to figure out what would hold the drawstring closed. At first I thought about a bead, but I didn't have anything on hand that really suited--I envisioned beads as tassels on the dangling pieces of leather, but to cinch the drawstring and hold it closed ... that was another problem.
I dove into the random metal pieces on my desk and found a beautiful steel coil just sitting there unused. It ended up being the perfect size for the drawstring! Huzzah!

At this point there were only two things left to do: line the whole purse with some sort of fabric, and permanently attach the shoulder strap. The former would prove to be a bit simpler than originally expected, but some ingenuity paid off on it.
My original idea called for lining the bag with some kind of black fabric, but what kind? I'd discussed it with my more sewing-friendly mother, and got some suggestions from her. But, as I sat, staring at the half-finished bag, I thought "hey, what about these black velvet pouches I use for my jewelry sales?" It turns out that the largest ones I have are almost the same width as the new chainmaille bag. Wow. How lucky is that? They were a bit too tall for it, but that's fixable, I figured. So, I hatched a new plan and hacked the top off of the pouch. I purposefully left it a little too tall, stuffed it inside the bag and then stuffed a piece of cardboard inside it. I used the cardboard to help hold the whole thing in shape so I could stretch the chainmaille (which would sag and slide out of place when moved around too much) over it. I pulled out some black thread and a needle and proceeded to stitch the velvet portion through the second row of rings.
I skipped the cinching rings for one main reason: they are not welded shut. If I'd stitched through them, the possibility exists that the thread would eventually work its way through those small slits in each ring and the whole thing would come apart. At least I think that would happen faster than the thread giving out otherwise.
Once the stitching was finished, all I had to do was cut the excess fabric, finish the tassels, and permanently attach the strap.
Finishing touches
To finish the tassels and ultimately add to the finished look of the bag, I used two pewter beads and tied knots in the ends of the suede cord to prevent the beads from slipping off the ends. This prevents the steel coil from sliding off as well. Easy!
The more difficult finishing touch was permanently attaching the strap. Ideally, I considered a run to the store to pick up rivets to put through the leather, but I decided that really wouldn't match the look of the bag very well, and along with that steel coil I found, I also had a nice fat titanium coil laying around. So I tried it, and it was the perfect fit (nice and snug) over the strap. So I decided to use it as a crimping coil. Thankfully, I still had more of the same wire to create another coil and did so. It only took a few minutes to get the two coils on and crimped down.


Thursday, October 14, 2010
New glass - part II
Yesterday, I told you that today I was planning to slump those holiday dishes -- what a bonehead I am! My plan was to run the kiln today, but on a full fuse batch. I had about 6 pieces that needed to be fully fused rather than tack fused, as I often do with glass.
I did actually get the kiln loaded & running early this morning at about 6:30am (I always start it up early so that I can empty it in the late afternoon, once it cools enough). It should actually be shutting off within the next hour, I believe, so that means that by sometime around 4pm, I should be able to peek in on my pieces & pull them out.
I've taken yesterday's pieces of glass and this morning worked nearly all of them into new jewelry designs that surprised even me! I love when something I'm dying to work into a design speaks to me so quickly, because often they take their sweet time. That sounds kind of weird, doesn't it?
Well, I guess you might be interested in actually seeing what some of these new pieces look like, huh? Well, I've got a few preview photos to post before these get listed in my Etsy shop (which should be soon).

The photo above is a piece of glass that is flanked by gold-filled round beads and some large swarovski crystal beads. It is strung on gold-filled chain. The following is its alter-ego:

Wednesday, October 13, 2010
New glass!
I'm not doing a very good job of keeping up with this blog, am I? Well, I have an excuse: My birthday fell in the middle of last week, and one of my "gifts" was my annual trip to a single San Francisco 49ers football game (and for all you football fans out there, yes, you can laugh, because the 49ers are ... not good so far this year). Let's just say that it's a darn good thing that the SF Giants are moving onto the NLCS! *whistles* So, after a busy week and a long weekend, I'm finally back to work.
And now that I'm back to work, I have some very cool news! I have added a few new chainmaille pieces to my shop, and I also have some new fused glass pieces coming. My geometric tack fused creations seem to be most popular, and I have a few more of those in the works. I will likely get the chance to post photos here on the blog tomorrow, and maybe upload one or two to my Etsy shop.
Today was the 2nd time in a few weeks that I've actually fired up my kiln, completely filled. I'm working on a cute set of holiday glass dishes, so this firing contained one of those along with a number of small jewelry-sized pieces of glass, all of which is very geometric. Most of them have already spoken to me about where they should be used, so I've already begun the process of mounting the glass onto bails with epoxy.
Tomorrow I'm planning to slump the holiday dishes, so hopefully that goes well! ^_^ If it does, I may have some new holiday items in my shop in the coming week.
Friday, October 1, 2010
Helloooo October!
There's nothing quite like the feeling of fall ... ok, well, in California you don't necessarily get the same feeling as say... in Pennsylvania, but still! It's fall, and it's one of my favorite times of year. I love the cool crisp air, the changing colors of leaves, Halloween, and the anticipation of the holidays.
Back when I lived in Massachusetts and even in Pennsylvania, this was also the time of year that the threat of snow began to grow--and I love winter and the snow. For some reason, I also find fall to be a very inspirational time of year (probably only marginally ahead of spring), and often find myself filled with lots of new ideas. I suppose it also isn't too surprising that my birthday is also during this wonderful time of year--does that make me love the fall more? Perhaps.
I have lots of great new ideas for new jewelry projects that should keep me busy for awhile. I'm looking forward to getting back into working with metal clay again (it's been a little while since I played with it), and I have some really fun ideas that I'd like to try out.
I am also anticipating the arrival of my chainmaille supplies package--I was a bit disappointed yesterday when it was delayed in shipment, but it is already out for delivery today (yay!). I wish I had some new photos to post today, but I'm sort of stuck in creative limbo while I hunt for a firing vessel for my bronze and copper clays and wait for my package to arrive.
I should have much more to post about next week after getting some time to work on new pieces ^_^.
Thursday, September 30, 2010
Disappointments & successes
Well, yesterday I promised not to neglect the blog, and I also promised an upcoming blog post about my other in-reserve chainmaille pieces that I plan to enter in a contest this year. I figure it's about time I at least post a photo (albeit, not a great shot) of it.
I dub thee: Celtic Dreams
This necklace was inspired by my love for Celtic design. I've long been a fan of Celtic knotwork, and have in the past made hand-painted wooden boxes adorned with these designs. I still have a few of these in my possession. But, I digress! This post is about jewelry, not boxes.
I've wanted to make a really unique and beautiful Celtic-inspired necklace not quite anything like the ones I've seen out there, so with a book of royalty-free designs in hand, I selected one that lent itself well to what I was trying to do. Using that design, I took a syringe filled with silver clay paste and piped out the design onto a non-stick surface. From there, I set a few pieces of white cubic zirconia in as accents and then let the piece dry thoroughly.
Once it was dry, I began the tedious task of filing and smoothing as best I could. I found I really could have used some new sandpaper, so I didn't get it as smooth as I originally wanted, but that's OK. The bit of texture gives it some personality. ^_^ I then put the piece into the kiln to be fired, and lo and behold, it came out just fine. Next came the task of polishing. Ohhhh how I loathe polishing metal clay! I have found, though, a nice method that works well for me, and it involves a combination of filing, sanding, brushing, and finally tumbling. And boy.. when I'm done, these pieces do S-H-I-N-E!
Then the question came ... 'ok, this thing turned out beautiful, now what do I do with it?' I knew I wanted to make a necklace, but just exactly what kind, I didn't know. Most of the chainmaille weaves I use often just don't go well with Celtic knots. So, I start looking at weaves... and huzzah! What do I find? A weave called "Celtic Visions". HA! I'd forgotten all about that one! I settled on this weave or, my little tweaked version of it, that is, and set to work. I think I had the chain woven in a day and a half, only because life interferes sometimes (bleh! lol). I attached the chain to the finished piece of metal clay and was mostly happy, but felt that it lacked something.
Enter onyx and purple CZ from stage left.
I love purple and black, and so these two seemed just perfect for adding a splash of color and contrast to an otherwise totally silver, blindingly shiney piece. So, I worked them into the design and voila! You have Celtic Dreams!
Disappointments, you say?
But the title of this blog suggests something less than successful too, Z! Yes, yes it does. Today's disappointment was finding that my chainmaille supplies package has been delayed by a "Late train" according to UPS. *sigh* One more day ... just one more. Ohhh, how that new titanium calls to me!
I dub thee: Celtic Dreams
This necklace was inspired by my love for Celtic design. I've long been a fan of Celtic knotwork, and have in the past made hand-painted wooden boxes adorned with these designs. I still have a few of these in my possession. But, I digress! This post is about jewelry, not boxes.
I've wanted to make a really unique and beautiful Celtic-inspired necklace not quite anything like the ones I've seen out there, so with a book of royalty-free designs in hand, I selected one that lent itself well to what I was trying to do. Using that design, I took a syringe filled with silver clay paste and piped out the design onto a non-stick surface. From there, I set a few pieces of white cubic zirconia in as accents and then let the piece dry thoroughly.
Once it was dry, I began the tedious task of filing and smoothing as best I could. I found I really could have used some new sandpaper, so I didn't get it as smooth as I originally wanted, but that's OK. The bit of texture gives it some personality. ^_^ I then put the piece into the kiln to be fired, and lo and behold, it came out just fine. Next came the task of polishing. Ohhhh how I loathe polishing metal clay! I have found, though, a nice method that works well for me, and it involves a combination of filing, sanding, brushing, and finally tumbling. And boy.. when I'm done, these pieces do S-H-I-N-E!
Then the question came ... 'ok, this thing turned out beautiful, now what do I do with it?' I knew I wanted to make a necklace, but just exactly what kind, I didn't know. Most of the chainmaille weaves I use often just don't go well with Celtic knots. So, I start looking at weaves... and huzzah! What do I find? A weave called "Celtic Visions". HA! I'd forgotten all about that one! I settled on this weave or, my little tweaked version of it, that is, and set to work. I think I had the chain woven in a day and a half, only because life interferes sometimes (bleh! lol). I attached the chain to the finished piece of metal clay and was mostly happy, but felt that it lacked something.
Enter onyx and purple CZ from stage left.
I love purple and black, and so these two seemed just perfect for adding a splash of color and contrast to an otherwise totally silver, blindingly shiney piece. So, I worked them into the design and voila! You have Celtic Dreams!
 |
| "Celtic Dreams" by zerospace |
Disappointments, you say?
But the title of this blog suggests something less than successful too, Z! Yes, yes it does. Today's disappointment was finding that my chainmaille supplies package has been delayed by a "Late train" according to UPS. *sigh* One more day ... just one more. Ohhh, how that new titanium calls to me!
Wednesday, September 29, 2010
On past designs... and future projects
Pardon my long absence from this blog! I suppose I could offer some excuse, but that's what it would be. An excuse. So, let's just forget the fact that I've neglected to post anything for awhile and move on. ^_^
A few days ago, I started pawing through my box of jewelry created during a long period of learning new techniques and just generally getting back into jewelry design after a long absence. All I can say about the experience is "oh my." Some of it I still love, but much of it struck me as odd or just downright ugly. *nervous laugh* I found myself just yesterday beginning the tedious process of dismantling the pieces that I could. That's one good thing about a lot of jewelry -- components can be re-used!
As a result, I have a bunch of mounted gemstones all ready to find their way into new pieces, and lots of sections of sterling and gold filled chain (the kind you buy in bulk, not my handmade chainmaille). I just can't help but cringe at some of the ideas I've had in the past, but I suppose everyone has to make their way somehow, right? That offers some consolation, I guess.
Even today, I often think that I lack vision, though my husband would never agree with that, as I am always dreaming up new things I'd like to make. More often than not, those things become a reality, sometimes after a lot of trial and error, but I'm pretty good these days at turning my visions into real tangible items. Of course, I have to have ideas first.
I have a lot of random projects going now, including things that have sat on the back burner for a long time. I'm also awaiting a much-needed shipment of new chainmaille supplies in metals I've had very little of for quite some time (hellloooo saw-cut titanium!). I'm looking forward to creating some new men's designs with a greater variety of titanium as well as some new designs overall with a hefty order of bronze, steel, and sterling.
I'm also sitting on two very beautiful chainmaille pieces that I'd love to list in my shop, but because I plan to enter them in a contest later this year/next year, I have to keep them in my possession for a few more months at the least. One of these pieces was the subject of an earlier blog post, but the other has yet to see the light of day. It's very celtic, and in my own biased opinion, beautiful. Look for a blog post about it in the near future!
Wednesday, September 15, 2010
Chainmaille purses, experiments & new items!
This is going to be more of a "here's what I've been working on" blog post, rather than about one specific project in general. I have plans to upload some new items to my Etsy shop today, as well. You may even see one of the experiments go up if I have a chance to photograph it.
Ongoing short-term project: Chainmaille purses
I don't mean to lead anyone on, but one of the projects I'm currently working on involves the making of small evening bag sized chainmaille purses. To start off, I'm creating the first one in stainless steel because of its strength and ability to resist rusting. If the first one is successful, I may consider creating others out of titanium, to make them lighter, but still strong and rust resistant. I doubt I'll ever go to sterling or gold-fill unless someone specifically requests one.
New experiments: Polymer clay
Yesterday, I was experimenting with a polymer clay idea. Actually, I was surfing the web and was inspired by something I saw online. I decided to try something with the basic concept in mind and was met at first with total failure. Heh, heh. Ahh, the best laid plans, as they say! What happened, you ask? Well you certainly don't think I'm going to leave you hanging, do you? Of course not!
So my experiment began with mixing a custom blend of polymer clay--I was going for a translucent look, and so used a small amount of colored clay blended with translucent. No big deal. I also blended in a fair amount of mica powder, because I wanted a pearl-y sparkly look to the finished piece throughout. No problems there either. I rolled it out, cut my shape and began doing detail work, which involved embedding some gold-filled wire and other components into the piece. All went well. Where things went horribly wrong was in the baking. Oh yes. I have only ever burned polymer clay once! Well, after yesterday, make it twice. But this was unlike anything I'd ever seen. It literally turned BLACK. But the most interesting thing happened when it did that -- the mica powder mixed with the bubbled black surface of the clay turned into what looked very much like antique gold! Huzzah! I have yet to actually do anything with this very interesting looking "failure", but I'm sure I will.
Later in the day, I used some of the leftover of my pre-mixed clay and re-made the piece. The baking this time went fine, as I watched it nearly the entire time and checked that the temperature on my clay oven was set a bit lower (I often forget it tends to be a little hot).
I was able to complete the new piece in the way I originally intended, and it turned out beautiful! I'm very happy with the results. Expect to see this piece possibly land in my Etsy shop sometime today. ^_^

Monday, September 13, 2010
September baseball ... inspiration!
If you're a fellow crafter or artist, have you ever felt inspired by something that seems totally unrelated to what you do? Well, I guess by both the title of this post and by the question I started out asking, you can imagine that I have. In fact, I've been trying to come up with a design inspired by my new favorite sport, baseball. I always regarded baseball as totally boring, and yet somehow I got sucked into it while my husband followed his favorite local team. Last year by the time the world series came around, I found myself totally intrigued by the sport, and I even watched the series between the Yankees and Phillies, even though I was a fan of neither team.
Despite enjoying watching baseball (I have barely missed a San Francisco Giants game this season!), I often find myself paying attention to the sometimes piles of necklaces the players often wear. Sometimes I'm amazed the things don't smack them in the face as they run the bases, make spectacular jumping or diving catches, or even while pitching. In fact, some of the pitchers have the most interesting things dangling around their necks. With some of the windups these guys employ, I wonder how those necklaces hold up.
What I've seen them wearing are various types of twisted or braided necklaces (I presume these are lightweight), but for some, I've seen heavy chains. Perhaps one of the most interesting (and inspiring) necklaces I've seen on a player is a necklace frequently worn by Giants starting pitcher, Barry Zito. I'm still trying to figure out what it's made with, but it looks like some kind of black cord (leather?) and silver beads or beads of some kind. Sadly, you just never get great closeup shots of these guys during the game--at least ones that show what I'm trying to see! (And I have to imagine I'm one of the few paying attention to details like that).
I find Zito's necklace interesting because it's the only one I've seen thus far that doesn't look totally "cookie-cutter". It isn't a large heavy chain, and it isn't a team-colors twisted or braided cord. It's got some style, and that fascinates me. I don't often see men wearing necklaces, but when I do, often it is chains or sometimes strings of heishi-style beads. So, when you see a guy wearing something that's still very suitable for a guy, but has some style and says something out of the ordinary, I'm intrigued. Go figure. Of course, I suppose it isn't any surprise that the guy wearing the most interesting piece of jewelry is Barry Zito--the same guy who's responsible for Pablo Sandoval's "Panda" nickname, and the same guy who convinced Aubrey Huff to use the Bee Gees' "Stayin' Alive" for his walk-up music. He's definitely a kindred creative spirit.
I wish I could finish this post off by saying that I've actually come up with a baseball-inspired design. But I can't, because I'm still working on it (d'oh!). But I promise, one is coming, and hopefully very soon. I do have some pretty cool stuff for men in my Etsy shop already, though -- including a pretty unique necklace that combines chainmaille and leather (see above photo).
Despite enjoying watching baseball (I have barely missed a San Francisco Giants game this season!), I often find myself paying attention to the sometimes piles of necklaces the players often wear. Sometimes I'm amazed the things don't smack them in the face as they run the bases, make spectacular jumping or diving catches, or even while pitching. In fact, some of the pitchers have the most interesting things dangling around their necks. With some of the windups these guys employ, I wonder how those necklaces hold up.
What I've seen them wearing are various types of twisted or braided necklaces (I presume these are lightweight), but for some, I've seen heavy chains. Perhaps one of the most interesting (and inspiring) necklaces I've seen on a player is a necklace frequently worn by Giants starting pitcher, Barry Zito. I'm still trying to figure out what it's made with, but it looks like some kind of black cord (leather?) and silver beads or beads of some kind. Sadly, you just never get great closeup shots of these guys during the game--at least ones that show what I'm trying to see! (And I have to imagine I'm one of the few paying attention to details like that).
 |
| Byzantine & leather men's necklace |
I wish I could finish this post off by saying that I've actually come up with a baseball-inspired design. But I can't, because I'm still working on it (d'oh!). But I promise, one is coming, and hopefully very soon. I do have some pretty cool stuff for men in my Etsy shop already, though -- including a pretty unique necklace that combines chainmaille and leather (see above photo).
Saturday, September 11, 2010
Best epoxy?
So, I've been making a lot of my chainmaille knotted earrings, as my last blog post suggests. Well, yesterday I managed to torque a pair of them enough (sometimes I think I'm harder on my work than anyone else ever would be) to actually snap the adhesive I used on them. Ack! Granted, the pair I torqued was probably not fully cured yet, but still. It concerned me greatly, as I was about to pack up a recently sold pair. Could I trust the epoxy? It certainly freaked me out quite a bit.
So, I decided to try my 30-minute 2-ton epoxy that I usually reserve for other types of projects (casting, etc). Well, I think beyond a doubt that this type of epoxy is worlds better than the stuff I'd been using. Yes, I have to allow it to set up for at least 15 minutes before actually applying it to the earring pad, but the final bond is rigid and so much stronger that I think I'll be suffering through the process in the future. I even re-bonded the sold pair of earrings using the stronger epoxy because more than anything, I want my customers to be happy.
I've decided to experiment with shorter-cure time epoxies, though. The original one I was using has a pretty long cure time and produces a waterproof, chemical-proof flexible bond, which for many applications is a great thing, but for others, it's a disaster in the making. Today I'm planning to pick up some 1 and 5 minute epoxies made by the same company as my 30 minute 2-ton epoxy. Time will tell if these are up to the challenge!
Thursday, September 9, 2010
Crazy for knots
So, it turns out that one of the most interesting things I've posted to my Etsy shop are my 'knotted' earring styles. I've made them in a variety of metals, but all generally are based on a spiral chainmaille weave. In this jewelry maker's humble opinion, they are probably one of the most simple things I make. Isn't it funny sometimes, how simple ideas are often the best? I love it!
After getting a good deal of interest in the pair of earrings shown to the left and another pair of copper knots, I decided to come up with a few more pairs. So, today, I'm posting two new pairs of sterling knot earrings (one very small and one a little bigger) plus a pair of larger copper knots.
Each of the new pairs is based again on variations of the basic chainmaille spiral weave. The funny part about the spiral is that if it is not done with the right size rings, it loses it's shape. To combat this, I usually do the spiral in either double or triple variations. Most of my knot earrings are of one of these two varieties, just with rings small enough to make the weave so tight it doesn't move almost at all.
My process is actually really simple: I make the knots and then put the in a tumbler for a few hours to shine up. Then they get a wash in soap and water and then bonded to a pair of earring posts (usually with a very strong epoxy). Simple!
For a little preview of what's to come in my Etsy shop, here are some new pictures:
Click the banner on the left to visit my Etsy shop (or just visit zerospace.etsy.com)!
 |
| 18k gold over sterling knot earrings |
Each of the new pairs is based again on variations of the basic chainmaille spiral weave. The funny part about the spiral is that if it is not done with the right size rings, it loses it's shape. To combat this, I usually do the spiral in either double or triple variations. Most of my knot earrings are of one of these two varieties, just with rings small enough to make the weave so tight it doesn't move almost at all.
My process is actually really simple: I make the knots and then put the in a tumbler for a few hours to shine up. Then they get a wash in soap and water and then bonded to a pair of earring posts (usually with a very strong epoxy). Simple!
For a little preview of what's to come in my Etsy shop, here are some new pictures:
 |
| sterling silver knotted earrings |
 |
| 100% pure copper knotted earrings |
Wednesday, September 8, 2010
Is hand-knotting pearls a dying art?
I had no idea how much interest there would be in simple strands of hand-knotted pearls until I uploaded a few to my Etsy shop. I'll admit, despite having worked in marketing for a few years of my writing career, I am positively awful at marketing myself. So, as you can well imagine, there has been little of me marketing these pearl strands I've listed. But, this leads me to the question, are there so few pearl-knotters out there that my pearl strands have received a seemingly over-abundance of attention without much effort on my part? I may never really find out the answer to that question, but if there are few of us left, I'll keep on knotting.
Yesterday, I completed knotting a new strand of pearls--ones I bought a couple of years ago, but just never got around to stringing. I knotted a double strand of gorgeous grey, cultured akoya pearls. I would say the toughest part about pearl knotting is making sure the end knots that hold the bead tips (those little metal things that attach to the clasp or rings that attach to the clasp) are strong and large enough to keep them from slipping off the ends of the necklace. Early on in my knotting adventures, I worried about the strength of my knots, and yet I have made and worn many of my own pearl necklaces for years, and not a single one has come apart yet. Only this has given me the confidence to sell them.
I've always found knotting pearls to be a very relaxing task, much like chainmaille. Both are pretty tedious hobbies, but for me, they are as rewarding as anything else I do. Sure, I also am known to spend hours writing web site source code, but I'm just ask likely to be found hovering over my work bench in my office, knotting a strand of pearls or weaving a new piece of chainmaille. I frequently bounce between my hobbies, usually when an idea strikes me for any one of them.
If there really are so few pearl knotters left; if the task has been relegated to workers in pearl farm countries like China who make low wages, I'll still keep doing it. There's something to be said for the phrase "handmade in the USA" to me!
 |
| Knotted mauve & white button pearls |
Yesterday, I completed knotting a new strand of pearls--ones I bought a couple of years ago, but just never got around to stringing. I knotted a double strand of gorgeous grey, cultured akoya pearls. I would say the toughest part about pearl knotting is making sure the end knots that hold the bead tips (those little metal things that attach to the clasp or rings that attach to the clasp) are strong and large enough to keep them from slipping off the ends of the necklace. Early on in my knotting adventures, I worried about the strength of my knots, and yet I have made and worn many of my own pearl necklaces for years, and not a single one has come apart yet. Only this has given me the confidence to sell them.
I've always found knotting pearls to be a very relaxing task, much like chainmaille. Both are pretty tedious hobbies, but for me, they are as rewarding as anything else I do. Sure, I also am known to spend hours writing web site source code, but I'm just ask likely to be found hovering over my work bench in my office, knotting a strand of pearls or weaving a new piece of chainmaille. I frequently bounce between my hobbies, usually when an idea strikes me for any one of them.
If there really are so few pearl knotters left; if the task has been relegated to workers in pearl farm countries like China who make low wages, I'll still keep doing it. There's something to be said for the phrase "handmade in the USA" to me!
Monday, August 30, 2010
Giving the workspace a facelift
It's really hard to work when your workspace perpetually looks as though a tornado just ripped through the room. At least, that's how I feel. This past weekend turned into an impromptu adventure in re-designing my entire office! Did I know it when the weekend began? Nope! But hey, sometimes you just can't fight the urge to organize.

Somewhere between childhood and adulthood, I turned into a neat-freak. I have no idea where it came from, because as a child, I was forever being sent to my room to clean it. Oh, how I hated cleaning. I think the turning point came the winter (in Pennsylvania) that we had a leak in our roof, and my closet literally overflowed. I recall my father tossing things out of my closet to reach the attic crawlspace that would allow him access to the area with the leak. The task of putting that closet back together forever changed how I decided what to keep and what to toss.
 Anyways, I still have a tendency to pull things out and forget to put them away, foolishly believing that I'll be using them again in the very near future. That is almost always not true. Saturday morning, my husband was in the office surfing the web on his computer. I wandered in to look at the state of disarray on my work desk. I cringed. After looking around the room a few times and feeling somewhat helpless, I realized that something was going to have to change. My part of the office (which is about 3/4 of it) looked like my childhood bedroom! Supplies everywhere, tools everywhere, and because of the mess, very little room to work. No wonder I've been using my dining room table!
Here's what my work bench looked like a couple of weeks ago:

So, I started thinking about how to fix the problem. After a lot of thinking, some planning, and a trip to the local Ikea, the room began to come into focus. As you can gather from the few photos near the beginning of this post, my office is much more organized now. And here's a few more shots, just for fun:

 Needless to say, I hope that I will be spending much more time using my now far more extended workspace!

Somewhere between childhood and adulthood, I turned into a neat-freak. I have no idea where it came from, because as a child, I was forever being sent to my room to clean it. Oh, how I hated cleaning. I think the turning point came the winter (in Pennsylvania) that we had a leak in our roof, and my closet literally overflowed. I recall my father tossing things out of my closet to reach the attic crawlspace that would allow him access to the area with the leak. The task of putting that closet back together forever changed how I decided what to keep and what to toss.

Here's what my work bench looked like a couple of weeks ago:

So, I started thinking about how to fix the problem. After a lot of thinking, some planning, and a trip to the local Ikea, the room began to come into focus. As you can gather from the few photos near the beginning of this post, my office is much more organized now. And here's a few more shots, just for fun:


Friday, August 27, 2010
Experiments with warm glass
Well, even though I've been fusing and slumping glass for 3+ years (thanks to a great teacher at a local class), I'm still experimenting with new ways to accomplish my sometimes rather lofty goals. One of my former accomplishments was finally finding success in making a pair of glass chopsticks, something I had long wanted to do.

Creating a pair of glass chopsticks presented an interesting issue for someone whose sole experience with warm glass was limited to fusing and slumping, as neither technique was terribly useful. Fusing required some sort of mold, which I didn't have. But, what I do have is some experience and knowledge in ceramics and pottery so, I thought I could create a ceramic mold of my own. Well, that would also require me to fire said mold, and I'm still waiting on my husband (an electrical engineer) to finally install a 20-amp breaker for my larger ceramics-capable kiln. My glass kiln requires much less power, so can run with a 15-amp breaker.
Anyways, after realizing that making a mold still wouldn't get me to quite where I wanted to be, I went back to the drawing board and while trolling my favorite glass supplier's web site, an idea struck me. What if I took the same glass rods that bead makers use and heat them in the center while gently pulling them apart? Could it work? I didn't know, but it was worth a shot. So, I ordered some glass rods (along with requesting MSDS sheets for them) and set to work. Well, the technique actually does work. I'm in dire need of some graphite shaping tools, and my general inexperience with torches and glass showed on my first few tries, but I slowly developed the method into one that works consistently.
I suppose if I wanted to create longer chopsticks, I could simple heat and shape the ends of a single glass rod, cut to the size I want. Maybe one day I'll make chinese-style chopsticks this way :-). Below, you'll see a photo of one of my more creative ventures in chopsticks-making. This was a normal pair of pulled glass chopsticks that I allowed to become wavy during a short polishing/slumping cycle in the kiln while resting on a fiber blanket.

Monday, August 16, 2010
Pearl-dipped fans: A wedding-style necklace
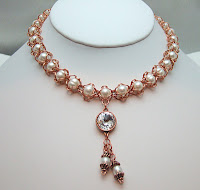
It's been awhile, hasn't it? Well, even though it's been awhile, I've certainly been busy enough creating new pieces for my shop. This next piece is one I'm calling Pearl-dipped fans. How does one "dip" something into pearls? Well, let's not get technical about it ^_~. Anyways, this particular necklace started out with the idea of creating a chain that would hold its shape, but still have the look of individual fans connected together. The chain portion of Pearl-dipped fans is the result of that experiment.
 Pearl-dipped fans chain is a simple variation of a typical European 4-in-1 chain. It is created with rows of small and large rings and then gathered with a larger ring so that one side is cinched. Putting the fans together into one piece of chain involves continuing the European weave at the tips of the fans with small rings.
 Since I've connected the fans in a way that makes them alternate in direction, each fan has cultured freshwater pearl drops in different sizes and styles. Fans with the large gathering ring facing "down" (as seen above) have a larger capped pearl hanging from that large gathering ring, while fans with the gathering ring facing "up" have smaller pearls dangling from each of the small border rings.

The center of the necklace has an open flowery design. I wanted to create a very simple looking celtic-inspired flower design. The result is actually a variant of an existing chainmaille weave (I wasn't aware of this a the time, but found some similar designs on the web afterwards). I connected 3 of these 'flowers' together with some rose-like links and then hung them in a V-style from the 3 fans at the center of the chain. From these flowers, I dangled more pearls and from the very center of the V, I dangled a gorgeous piece of color-changing Swarovski crystal.
In the end, we have Pearl-dipped fans as you see it now in the photo below:

More details: The chain is made with silver and gold-plated rings and bead caps, cultured freshwater pearls, and a Swarovski crystal rivoli bead. Look for it in my Etsy shop soon!
Sunday, February 7, 2010
Incorporating pearls into chain - Pearl Copper Fusion necklace
This piece started the other day as a great experiment with weaving beads into a piece of chain. It seems like a pretty simple idea, no? I thought so. I'd imagine that it's been done many times over by other jewelry artists, but, I had this vision of a strand of caged-looking pearls in my mind's eye when I started--something that a bride could wear to her wedding, even if that wedding would need to be a hair's width shy of traditional for something like it to be acceptable.
So, I began with two different sizes of 20 gauge copper rings that were cut quite awhile ago. 1/8" inner diameter for one and 3/16" inner diameter for the other. The idea was to construct a bead cage inspired somewhat by the basic byzantine weave. I could go on for ages about how much I love the byzantine, but it was those carrot-like angles that open towards each other in the byzantine that were the source of my inspiration here. What if I put a bead in there instead of a pair of rings? How could I accomplish something like that? Well, the result is not quite a byzantine with beads woven in, but more of a little creation of my mind and experimentation. Essentially, what I've done is create a frame around each bead using those two different sized rings, and I think it looks quite interesting!
 What I really love about this particular piece is that it holds its shape quite nicely. In fact, whether it's hanging or laying flat, it looks the same. Huzzah! Achieving a piece that looks as beautiful laying flat on a table as it does around your neck is jewelry perfection, in my opinion *nervous laugh*.
I wove about 12 inches of pearls and copper rings before switching the chain to a basic 2-in-2 weave. The reason I did this was to make the piece adjustable in size, because it is meant to be worn as a collar/choker style necklace. It can be as small as about 13.5 inches and as large as nearly 18 inches. A small hook allows you to hook into any pair of rings in the 2-in-2 portion of the chain, making it as tight or loose as you like. This lets anyone get pretty much the perfect fit, no matter how they would prefer to wear it.
 I finished the piece by hanging a Swarovski rivoli (a round cut pointed back "gemstone") mounted in antiqued copper to the front center pearl. From this lovely piece of clear crystal I dangled two rice-shaped white pearls, each capped with copper and connected to the crystal link with the same small copper rings I used in the rest of the necklace.
The pearls I used are about 6-7mm in diameter and are probably C or D grade pearls (they have nice luster, but many are almost a peanut in shape with very visible banding around the center). What's interesting about using these particular grade of pearls here is that when caged in the copper rings, the irregular shape of the pearls begins to disappear, making the entire piece look a bit more expensive than it really is. I love it!
I decided to call this necklace "Pearl Copper Fusion". I know it is not a rather inventive name, but as it is my most successful experiment yet with weaving any type of bead into a chain, it works. I am actually quite fond of this particular piece, but it will likely be listed soon in my Etsy shop. ^_^

So, I began with two different sizes of 20 gauge copper rings that were cut quite awhile ago. 1/8" inner diameter for one and 3/16" inner diameter for the other. The idea was to construct a bead cage inspired somewhat by the basic byzantine weave. I could go on for ages about how much I love the byzantine, but it was those carrot-like angles that open towards each other in the byzantine that were the source of my inspiration here. What if I put a bead in there instead of a pair of rings? How could I accomplish something like that? Well, the result is not quite a byzantine with beads woven in, but more of a little creation of my mind and experimentation. Essentially, what I've done is create a frame around each bead using those two different sized rings, and I think it looks quite interesting!

I wove about 12 inches of pearls and copper rings before switching the chain to a basic 2-in-2 weave. The reason I did this was to make the piece adjustable in size, because it is meant to be worn as a collar/choker style necklace. It can be as small as about 13.5 inches and as large as nearly 18 inches. A small hook allows you to hook into any pair of rings in the 2-in-2 portion of the chain, making it as tight or loose as you like. This lets anyone get pretty much the perfect fit, no matter how they would prefer to wear it.

The pearls I used are about 6-7mm in diameter and are probably C or D grade pearls (they have nice luster, but many are almost a peanut in shape with very visible banding around the center). What's interesting about using these particular grade of pearls here is that when caged in the copper rings, the irregular shape of the pearls begins to disappear, making the entire piece look a bit more expensive than it really is. I love it!
I decided to call this necklace "Pearl Copper Fusion". I know it is not a rather inventive name, but as it is my most successful experiment yet with weaving any type of bead into a chain, it works. I am actually quite fond of this particular piece, but it will likely be listed soon in my Etsy shop. ^_^
Friday, January 29, 2010
Anatomy of a Necklace - Sakura Collar
Last year I began weaving a chainmaille necklace in copper, and like most of my designs, it began in my head with just one section of the finished piece. I constructed several "flower" designs that use the helm (parallel chain) weave as a base, and then proceeded to connect them to one another such that they formed this lovely triangular shape. After that, I couldn't decide how to proceed, so I set the piece aside and worked on other things. I created some web software, moved all of my web sites to a new host, and did just about everything but create a piece of jewelry.
Then, after nearly a year of stagnation, I was looking through my container of unfinished ideas, and pulled this lovely hunk of copper out and stared at it for a few minutes. Feeling inspired, I resolved to finally complete the project. I took out what I had in already-cut copper jump rings and began to weave additional flowers, thinking I'd create something of a floral pattern weave. After constructing 4 more flowers, I realized that perhaps the whole piece would lay strangely if the large flowers made up the entire length of the necklace, so I attached these new flowers to the original three, and then considered the best type of chain to complete the necklace.

I needed something to balance the size of the large flowers, but also be small enough to complete the length of the necklace without being too intrusive at the back. It is sometimes hard to describe why something doesn't look quite right in a design--you just tend to know when something doesn't fit. Nearly every normal chain pattern I might use was just too small to complete the necklace and look totally in balance. So, I designed these little "half flowers", as I decided to call them at the time. In my opinion, they ended up completing the look of the necklace perfectly!

From there, it was a matter of giving enough length to the piece to allow it to fit nearly any wearer--I created a simple 2-in-2 extender chain and attached that and a clasp to the back.
With the back finished, I felt that the front of the necklace was in need of a little contrasting color, and something to complete that triangle created by the first three flowers at the center. After digging through my packs of gemstones, beads, and other supplies, I finally settled on the amazing contrast created by a nugget of blue apatite. I can't say enough about how much I love the color of blue apatite--it's this gorgeous aqua blue, and it looks amazing when paired with the warm red hue of copper. Blue apatite for me was love at first sight. Anyways, I finished the lovely nugget with some shiny copper bead caps and some copper wire, and made a pendant to hang from the tip of the flower triangle.
I called the finished piece the Sakura Collar:

You can find the Sakura Collar for sale in my Etsy shop soon!
Subscribe to:
Posts (Atom)